
Template variables let a campaign send the same message structure to hundreds of contacts, with the name, company or job title swapped for each recipient. You link each dynamic slot (#{{1}}, #{{2}}, #{{3}}) in the template to a contact field just once, inside the campaign step, and each person gets a message that feels written just for them.
Available on: All plans.
Who can do it: Any user with access to the Campaigns module.
What you need before you start
-
At least one connected WhatsApp inbox on the platform
-
At least one Meta-approved template linked to the inbox you'll use, with text variables (#{{1}}, #{{2}}, etc.). Creating templates is covered in: How to create WhatsApp templates with variables
-
Audience contacts with the fields you'll map filled in (if you'll link #{{1}} to the name, contacts need the Name field filled in). When the data might be missing, use the default text described below
-
Access to the Campaigns module in the side navigation
Set up variables in a campaign step
Mapping happens in Step 3: Message sequence of campaign creation. Each step in the sequence has its own template and its own mapping, independent of the others.
-
In the side navigation, click Campaigns
-
Click New campaign, or open an existing campaign in Draft status
-
Fill in the name, select the WhatsApp channel and set up the audience in the previous steps
-
In Step 3, click Add step
-
In the Connection field, select the inbox (the sender) from the dropdown
-
In Send type, select Template
-
Click Select template. The dropdown only shows the approved templates for the chosen inbox
-
Choose the template. The platform shows the variables it found (e.g. #{{1}}, #{{2}})
-
For each variable, choose the matching contact field from the dropdown (if the variable fields were already mapped when the template was created, you don't need to assign them):
-
Name, Email, Phone, Country (fixed fields)
-
Custom fields created by the company admin
-
-
If you want, fill in the Default variable text: the text that goes into the message when the contact doesn't have that data
-
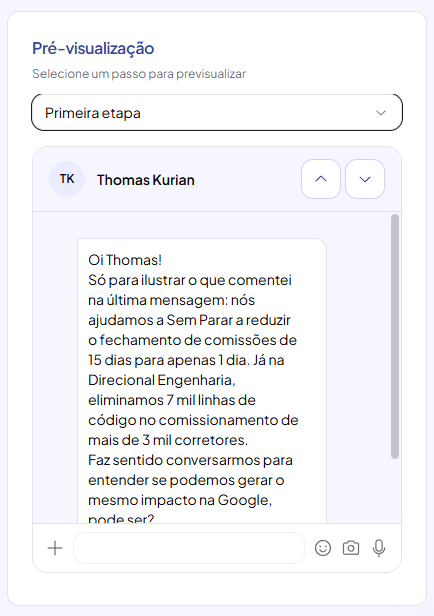
Follow the side preview, which updates in real time with data from a real contact in the audience
[GIF: Selecting a template in the campaign]
Check the mapping in the preview
The side preview uses real data from contacts in the audience, not made-up examples. This way you can check how the message will reach each prospect before launching.
-
In the step list, click the step you want to check. The side preview updates on its own
-
Use the Previous and Next arrows in the preview to go through different contacts in the audience
-
Check that every variable shows the right value for each contact
-
If a variable shows up empty, the platform shows an incomplete mapping warning. Fix it before launching
The preview already applies WhatsApp formatting: bold (*texto*), italics (_texto_) and line breaks look the way the recipient will see them in the app.
Each field's value goes into the preview exactly as it's saved, including when it has a currency symbol or punctuation (e.g. R$ 1.200,00). The text you see in the preview is the same text that goes out to the lead.
Fields available for mapping
Fixed contact fields
Available for every contact on the platform:
| Field | Example of use in the template |
|---|---|
| Name | “Hi, #{{1}}! How are you?” becomes “Hi, John! How are you?” |
| “I sent some material to #{{1}}” | |
| Phone | Rarely used, since the message goes to the contact's number |
| Country | “I saw you're in #{{1}}…” |
The platform also offers fields derived from the full name, such as first name and last name.
Custom fields
Fields created by the company admin, which show up in the mapping dropdown. Both fields with the Contact context and fields with the Mixed context appear in the campaign message editor:
| Example field | Example of use |
|---|---|
| Company | “I saw you work at #{{1}}…” |
| Job title | “As #{{1}}, you probably deal with…” |
| Industry | “We work with many companies in the #{{1}} industry…” |
| City | “Great to talk to someone from #{{1}}!” |
Supported template components
Not every template component accepts variables. Here's what applies:
| Status | Component | Variable support |
|---|---|---|
| ✅ | Header (text) | Accepts 1 variable (#{{1}}) |
| ✅ | Body | Main component, accepts several variables (#{{1}}, #{{2}}, etc.) |
| ❌ | Footer | Doesn't accept variables, it's fixed text only (Meta rule) |
| ❌ | Buttons with fixed text | Don't use variables |
| ⚠️ | Dynamic URL buttons | Limited support. Check with support whether your inbox and plan cover this case |
What happens at send time
Variables are resolved when each step is sent, not when the campaign is launched. In practice:
-
The platform fetches the contact's current data when it's time to send that step
-
If the contact's field changes between one step and the next, the next step uses the updated value
-
The field value is inserted into the text exactly as it's saved, with no extra character handling
-
If a contact doesn't have the mapped field filled in and the variable has no default text, the message isn't sent to them and the enrollment ends as a failure
-
If the variable has default text, the message goes out normally, with that text in place of the variable
Default text: send even when the contact doesn't have the data
Missing data is routine: a new lead has no city, a contact who came from a form has no company in the first few seconds. Before, a single empty variable dropped the whole message for that contact. With default text, you define what goes in place of the variable, and the message goes out.
Where to fill it in
The Default variable text block appears inside the step, both in Step 3 of creation (under Add step) and when creating or editing a step on the campaign screen. It works for both send types:
-
Template: the block appears after you select the template, with one field per template variable
-
Text: the block appears below the message field, with one field per variable you typed
Each field is identified by the variable name (e.g. #{{var_contact_city}}), and the block's subtitle sums up the rule: “Optional. If the contact doesn't have the data, the message is sent with this text in place of the variable, instead of not being sent.”
-
Set up the step as usual (inbox, send type, template or text)
-
In the Default variable text block, fill in the field for the variable you want to protect (e.g. for the city, write your area)
-
Leave blank the variables you don't want to protect. An empty field means “no default text”, that is, the old behavior
-
Save the step
What default text does and doesn't do
| Situation | What happens |
|---|---|
| Contact without the field filled in, variable with default text | The message is sent with the default text in place of the variable |
| Contact with the field present, but empty | Same as above: the default text is used too |
| Contact without the field filled in, variable without default text | Same as before: the send fails and the failure names the field |
| Contact with the field filled in | The contact's real value always wins. Default text is only used when the data is missing |
| List column variable (var_col_) | Default text does not apply. An empty list column still drops the send |
| Template sent manually from inside a conversation | Default text does not apply: it's a campaign step setting |
Filling rules
Default text is validated when you save the step. Three things make the platform reject it:
| Rule | Error message |
|---|---|
| No line breaks, tabs or more than four spaces in a row | “Default text for X can't have line breaks, tabs or more than four spaces in a row.” |
| A single default text can't go over the message character limit | “Default text for X exceeds the message limit: N characters fit.” |
| The sum of all default texts in the step can't go over the limit | “The default texts combined exceed the message limit: N characters fit for all of them together.” |
The calculation already deducts the space of the #{{…}} itself, which disappears when the default text goes in. The field also limits typing to the space available, as guidance: the final rejection comes from the platform when you save.
Limits and rules
| Rule | Value |
|---|---|
| Number of variables per template | Set when the template is created and approved. Nuvia doesn't add its own limit to the mapping |
| Character limit | The message body, with variables filled in, can't go over 1,024 characters (Meta limit) |
| Variable types | Text variables only (#{{n}}). Media variables (image, video, document) need separate setup |
| Data source | Contact fields only (fixed or custom). You can't enter free text as a value |
| Default text per variable | Optional, set in the campaign step. Applies to template and text steps. Doesn't apply to list column variables (var_col_) or to templates sent manually from the conversation |
| Characters not allowed in default text | Line breaks, tabs and more than four spaces in a row |
| Default text length | Each default text, and the sum of all of them in the step, must fit within the message character limit. In template steps, length isn't validated when saving, only the character rules |
| Special characters in the value | The field value goes into the message exactly as saved, including currency symbols and punctuation (e.g. R$ 1.200,00). You don't need to escape anything, and the preview shows the same text that goes out to the lead |
| Available templates | Only templates with Approved status from Meta |
| Filter by inbox | The dropdown only shows templates for the inbox selected in the step |
| After activation | The mapping and default text are part of the step content and can't be changed once the campaign is in Active status |
| Recommendation | 2 to 3 variables per template. Meta also rejects templates with too many variables for the message length |
| Variables at the edges | The body can't start or end with a variable, even when followed or preceded by punctuation (e.g. #{{1}}?, ? #{{1}}). The platform blocks saving with the message “The message body can't start or end with variables” |